
Creating roles
Roles contain the permissions for each role. You assign a role when adding a new user.
To add a new role:
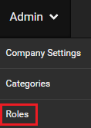
- Go to Admin > Roles.
- Click Add Role.
- Enter the following information in the General tab:
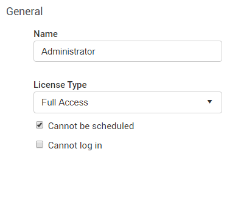
- Name: The name of the role.
- License Type: The license type of the role affects the permissions and billing for the user
- Full Access: The permissions of the role are not restricted in any way.
- Read Only: The permissions of the role will be restricted from modifying the schedule and administration tasks.
- Cannot be scheduled: Select this checkbox if you do not want users with this role to show in the list for schedulers assigning users (crews) to dispatches.
- Cannot log in: Select this checkbox if you want users with this role to be disabled from logging into DropTime. This is useful, for example, if the user represents an external customer and will never log in.
- Enter the following information in the Area tab:
- Categories: Select this checkbox to give the role the ability to manage categories.
- Roles: Select this checkbox to give the role the ability to manage roles.
- Company Settings: Select this checkbox to give the role access to Company Settings.
- Import: Select this checkbox to give the role access to the Import module.
- Reports: Select this checkbox to give the role access to the Reports module.
- API: Select this checkbox to give the role access to the API functions.
- Enter the following information in the Schedule tab:
- View schedule as read-only: Select this checkbox to give the role read-only access to the Schedule module. This means that the user cannot add or edit any data and can only view the Information tab on the Schedule.
- Access schedule for: Select whether the role can access dispatches on the Schedule for all plants or only the specific plants to which the role is assigned.
- Can add on-the-fly category items: Select this checkbox to give the role the ability to add category items in the Schedule (instead of having to exit the Schedule to add in Items > [category name]).
- Can post the schedule: Select this checkbox to give the role the ability to post dispatches.
- Enter the following information in the Administration tab:
- Manage user accounts for: Select whether the role can manage user accounts for all plants or only specific ones.
- Assignable roles: Select the roles that this role can assign to others.
- Can view and restore deactivated users: Select this checkbox to allow the role to view and restore deactivated users.
- Allow adding and modifying Outlook Report Profiles: Select this checkbox to allow the role to add and modify report profiles for the Outlook Report.
Allow modifying Single Line Layout profiles: Select this checkbox to allow the role to create, modify, and delete Single Line Layout profiles in View Settings.
- To add or remove categories to the role:
- From the Categories menu, click Add. The available categories appear in the Available Categories box at the bottom of the page.
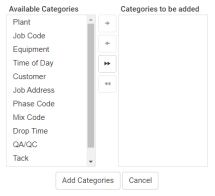
- Select the categories from the left box you want to give the role access to, and then click > or >>. The selected categories appear in the Categories to be added box.
- Next, click Add Categories. The categories appear in the Qualifications section.
- Click Save.
- To remove any categories from the role, click the checkbox for the categories you want to remove, and then click Remove.
- From the Categories menu, click Add. The available categories appear in the Available Categories box at the bottom of the page.
- Enter the following information in the Alerts tab:
- Administrate schedule change alert rules: Select this checkbox if users in this role can add and modify schedule change alert rules.
- Enter the following information in the Views tab:
- Can add, edit, and delete public views: Select this checkbox to allow the role to add, edit, and delete public views. For more information about views, see Managing Views.
- Can have private views: Select this checkbox to allow the role to create and manage private views.
- Enter the following information in the Security tab:
- Session time out (in minutes): Enter the number of minutes of inactivity until the system times out for this role.
- Click Save to save the role.
Copyright © 2020 DropTime